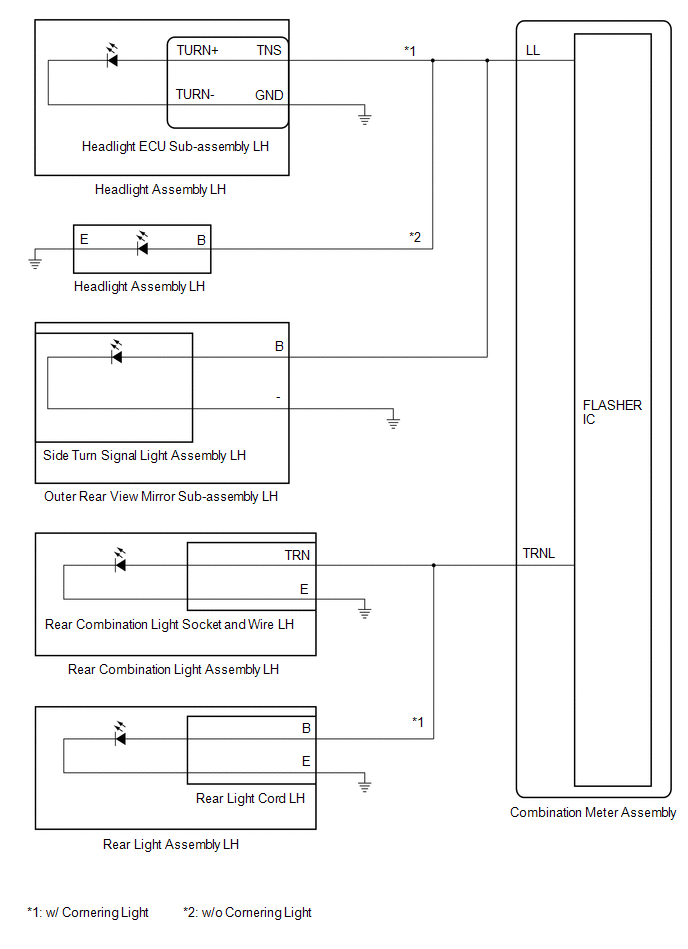
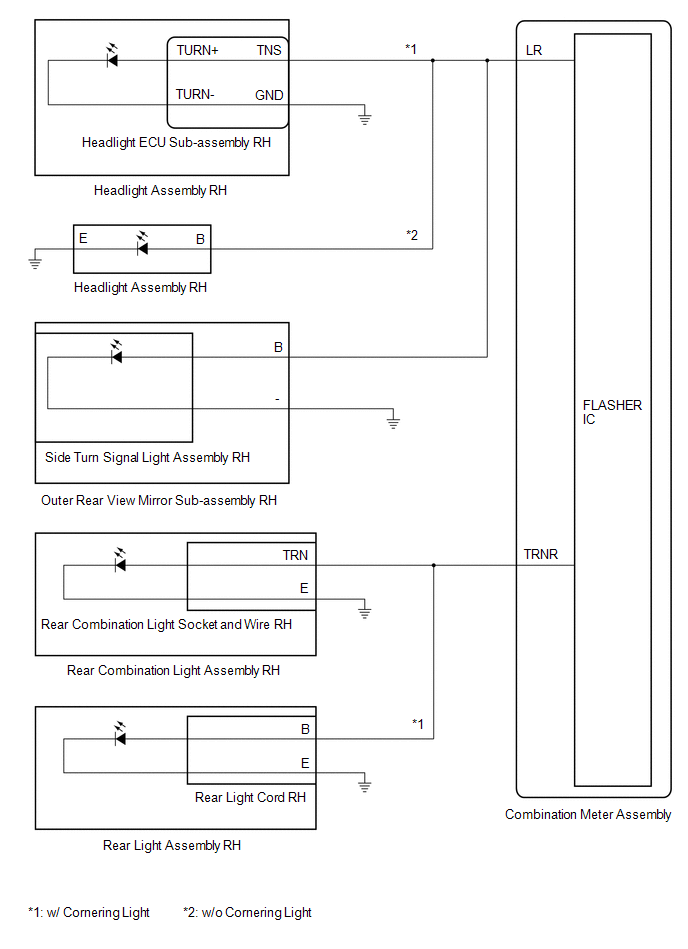
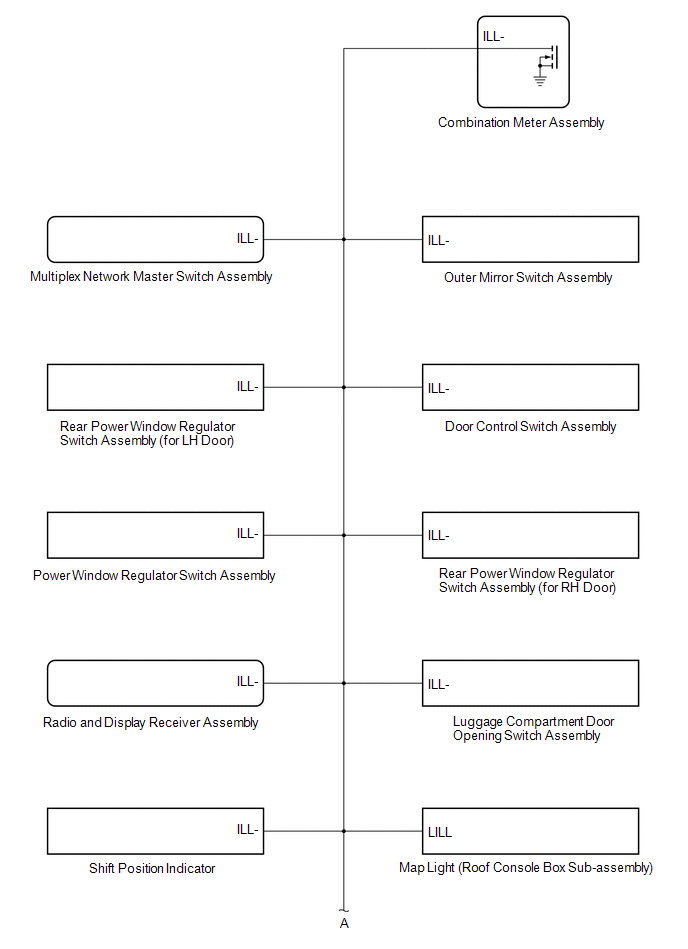
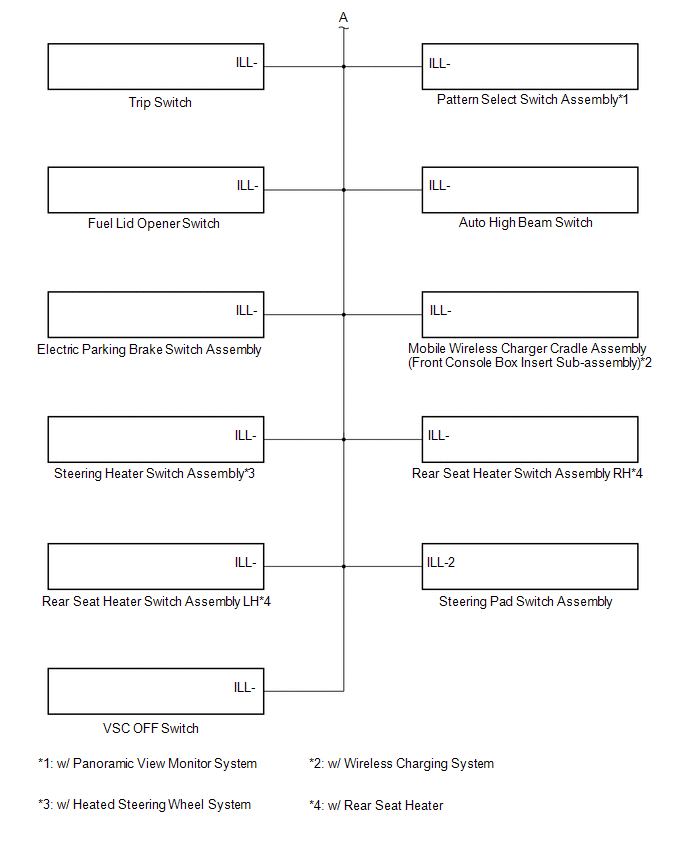
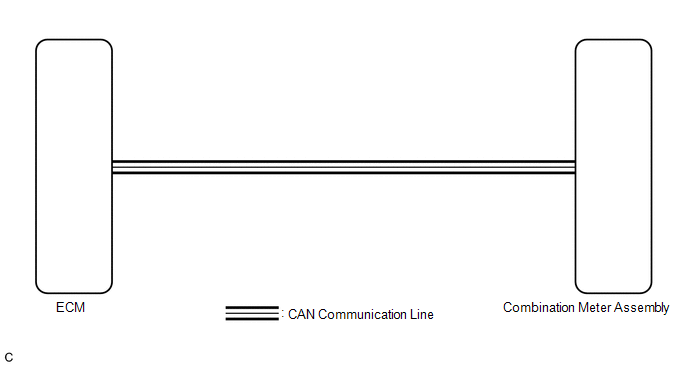
SYSTEM DIAGRAM HINT: Refer to System Diagram of CAN Communication System. Click here COMBINATION METER ASSEMBLY DIAGRAM TURN SIGNAL LIGHT DIAGRAM (a) LH Side (b) RH Side ILLUMINATION DIAGRAM SPEED SIGNAL DIAGRAM DESCRIPTION In this
circuit, the combination meter assembly receives engine speed signals
from the ECM via CAN communication. The combination meter assembly
displays the engine speed calculated based on the data received from the
ECM. WIRING DIAGRAM CAUTION / NOTICE / HINT NOTICE: Click here PROCEDURE 1. CHECK CAN COMMUNICATION SYSTEM (a) Check if CAN communication DTCs are output. Click here
Result Proceed to CAN communication DTCs are not output A CAN communication DTCs are output B GO TO CAN COMMUNICATION SYSTEM 2. CHECK FOR DTC (SFI SYSTEM) (a) Check if SFI system DTCs are output. Result Proceed to DTCs are not output A DTCs are output B GO TO SFI SYSTEM 3. PERFORM ACTIVE TEST USING TECHSTREAM (a) Connect the Techstream to the DLC3. (b) Turn the engine switch on (IG). (c) Turn the Techstream on. (d) Enter the following menus: Body Electrical / Combination Meter / Active Test. (e) Perform the Active Test according to the display on the Techstream. Tester Display Measurement Item Control Range Diagnostic Note TachoMeter Operation (0rpm) Tachometer (0 rpm) ON - TachoMeter Operation (1000rpm) Tachometer (1000 rpm) ON - TachoMeter Operation (2000rpm) Tachometer (2000 rpm) ON - TachoMeter Operation (3000rpm) Tachometer (3000 rpm) ON - TachoMeter Operation (4000rpm) Tachometer (4000 rpm) ON - TachoMeter Operation (5000rpm) Tachometer (5000 rpm) ON - TachoMeter Operation (6000rpm) Tachometer (6000 rpm) ON - TachoMeter Operation (7000rpm) Tachometer (7000 rpm) ON - Tester Display TachoMeter Operation (0rpm) Tester Display TachoMeter Operation (1000rpm) Tester Display TachoMeter Operation (2000rpm) Tester Display TachoMeter Operation (3000rpm) Tester Display TachoMeter Operation (4000rpm) Tester Display TachoMeter Operation (5000rpm) Tester Display TachoMeter Operation (6000rpm) Tester Display TachoMeter Operation (7000rpm) OK: Tachometer indication is normal. REPLACE ECM REPLACE COMBINATION METER ASSEMBLY TERMINALS OF ECU COMBINATION METER ASSEMBLY (a) Measure the voltage and resistance and check for pulses according to the value(s) in the table below. Terminal No. (Symbol) Wiring Color Terminal Description Signal Input/Output Condition Specified Condition G16-1 (ILL-) - Body ground LA-L - Body ground Illumination signal Output Taillights off ŌåÆ Taillights on Below 1 V ŌåÆ Pulse generation G16-2 (EP) - Body ground W-B - Body ground Ground - Always Below 1 ╬® G16-4 (INT) - Body ground L - Body ground Tire pressure warning ECU and receiver signal Output Below 1.5 V ŌåÆ 8 to 15 V G16-5 (SI) - Body ground W - Body ground Speed signal for other systems (Input) Input Engine switch on (IG), wheel being rotated Pulse generation (See waveform 1) G16-6 (+S) - Body ground L - Body ground Speed signal for other systems (Output) Output Engine switch on (IG), wheel being rotated Pulse generation (See waveform 1) G16-7 (VCM) - Body ground BE - Body ground Vacuum warning switch signal Input Engine started, vacuum warning switch off (brake warning light off) ŌåÆ Vacuum warning switch on (brake warning light on) 11 to 14 V ŌåÆ Below 1 V G16-9 (S) - Body ground LA-R - Body ground Engine oil pressure signal Input Engine not started ŌåÆ Engine started Below 1 V ŌåÆ 11 to 14 V G16-12 (SW) - Body ground G - Body ground Brake fluid level signal Input Engine switch on (IG), brake fluid level not low (brake warning light off) ŌåÆ Brake fluid level low (brake warning light on) 11 to 14 V ŌåÆ Below 1 V G16-14 (FR) - G16-33 (FE) LG - BE Fuel level signal Input Engine switch on (IG), fuel level full ŌåÆ Fuel level low (fuel level warning light on) Pulse generation (See waveform 2) G16-15 (FV) - Body ground GR - Body ground Fuel sender gauge (Power source) - Engine switch on (IG) Pulse generation (See waveform 3) G16-17 (WLVL) - Body ground LG - Body ground Washer fluid level signal Input Engine switch on (IG), washer fluid level not low ŌåÆ Washer fluid level low 11 to 14 V ŌåÆ Below 1 V G16-18 (RLMT) -Body ground BE - Body ground Rear seat belt warning light LH signal Output Engine
switch on (IG), rear seat belt warning light LH (radio and display
receiver assembly) off ŌåÆ Rear seat belt warning light LH (radio and
display receiver assembly) on 11 to 14 V ŌåÆ Below 1 V G16-19 (RCMT) -Body ground R - Body ground Rear seat belt warning light center signal Output Engine
switch on (IG), rear seat belt warning light center (radio and display
receiver assembly) off ŌåÆ Rear seat belt warning light center (radio and
display receiver assembly) on 11 to 14 V ŌåÆ Below 1 V G16-20 (RRMT) -Body ground G - Body ground Rear seat belt warning light RH signal Output Engine
switch on (IG), rear seat belt warning light RH (radio and display
receiver assembly) off ŌåÆ Rear seat belt warning light RH (radio and
display receiver assembly) on 11 to 14 V ŌåÆ Below 1 V G16-21 (ES) - Body ground W-B - Body ground Ground - Always Below 1 ╬® G16-24 (RLSB) - Body ground SB - Body ground Rear seat belt buckle switch LH signal Input Engine switch on (IG), rear seat belt LH unfastened ŌåÆ Fastened Below 1 V ŌåÆ 11 to 14 V G16-25 (RCSB) - Body ground B - Body ground Rear seat belt buckle switch center signal Input Engine switch on (IG), rear seat belt center unfastened ŌåÆ Fastened Below 1 V ŌåÆ 11 to 14 V G16-26 (RRSB) - Body ground LG - Body ground Rear seat belt buckle switch RH signal Input Engine switch on (IG), rear seat belt RH unfastened ŌåÆ Fastened Below 1 V ŌåÆ 11 to 14 V G16-27 (OILW) - Body ground W - Body ground Engine oil level signal Input Engine switch on (IG), engine oil level not low ŌåÆ Engine oil level low Below 1 V ŌåÆ 11 to 14 V G16-28 (MSM+) - Body ground GR - Body ground Steering pad switch assembly signal Input Engine switch on (IG), up, down, right and left switches on steering pad switch assembly not pushed 4.8 to 5.2 V G16-29 (MSTI) - Body ground R - Body ground Steering pad switch assembly signal Input Engine switch on (IG), OK and back switches on steering pad switch assembly not pushed 4.8 to 5.2 V G16-31 (CANL) W CAN communication line Input/Output - - G16-32 (CANH) B CAN communication line Input/Output - - G16-36 (TX+) G Local bus communication line Input/Output - - G16-37 (TX-) W Local bus communication line Input/Output - - G16-39 (IG+) - Body ground GR - Body ground Engine switch signal - Engine switch off ŌåÆ Engine switch on (IG) Below 1 V ŌåÆ 11 to 14 V G16-40 (B) - Body ground LA-B - Body ground Battery - Always 11 to 14 V G15-1 (ODO) - Body ground LA-L - Body ground ODO/TRIP switch signal Input Engine switch on (IG), ODO/TRIP switch (trip switch) not pushed 4.8 to 5.2 V G15-2 (TR) - Body ground L - Body ground Light control rheostat switch signal Input Engine
switch on (IG), light control rheostat up switch (trip switch) and
light control rheostat down switch (trip switch) not pushed 4.8 to 5.2 V G15-3 (HAZ) - Body ground LA-R - Body ground Hazard warning switch signal Input Hazard
warning switch assembly (radio and display receiver assembly) off ŌåÆ
Hazard warning switch assembly (radio and display receiver assembly)
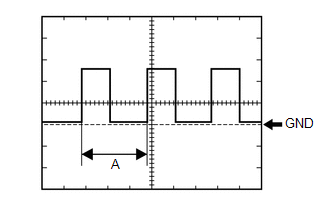
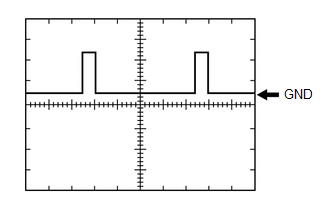
pushed 11 to 14 V ŌåÆ Below 1 V G15-5 (SW3) - Body ground LA-B - Body ground Ground for trip switch - Always Below 1 ╬® G15-7 (LR) - Body ground LA-G - Body ground Front turn signal light RH signal Output Engine switch on (IG), RH turn indicator light off ŌåÆ RH turn indicator light blinking Below 1 V ŌåÆ 11 to 14 V ŌåÉŌåÆ Below 1 V G15-8 (B) - Body ground LA-B - Body ground Battery - Always 11 to 14 V G15-10 (TRNL) - Body ground BE - Body ground Rear turn signal light LH signal Output Engine switch on (IG), LH turn indicator light off ŌåÆ LH turn indicator light blinking Below 1 V ŌåÆ 11 to 14 V ŌåÉŌåÆ Below 1 V G15-11 (LL) - Body ground LA-LG - Body ground Front turn signal light LH signal Output Engine switch on (IG), LH turn indicator light off ŌåÆ LH turn indicator light blinking Below 1 V ŌåÆ 11 to 14 V ŌåÉŌåÆ Below 1 V G15-13 (TRNR) - Body ground BE - Body ground Rear turn signal light RH signal Output Engine switch on (IG), RH turn indicator light off ŌåÆ RH turn indicator light blinking Below 1 V ŌåÆ 11 to 14 V ŌåÉŌåÆ Below 1 V Item Condition Tester connection Tool setting 5 V/DIV., 20 ms./DIV. Condition Engine switch on (IG), wheel being rotated HINT: When
the system is functioning normally, one wheel revolution generates 4
pulses. As the vehicle speed increases, the width indicated by (A) in
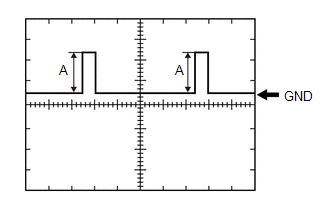
the illustration narrows. Item Condition Tester connection G16-14 (FR) - G16-33 (FE) Tool setting 2.5 V/DIV., 20 ms./DIV. Condition Engine switch on (IG), fuel level full ŌåÆ Fuel level low (fuel level warning light on) HINT: Item Condition Tester connection G16-15 (FV) - Body ground Tool setting 2.5 V/DIV., 20 ms./DIV. Condition Engine switch on (IG) HINT: Engine switch on (IG) (4.5 to 5.5 V)System Diagram

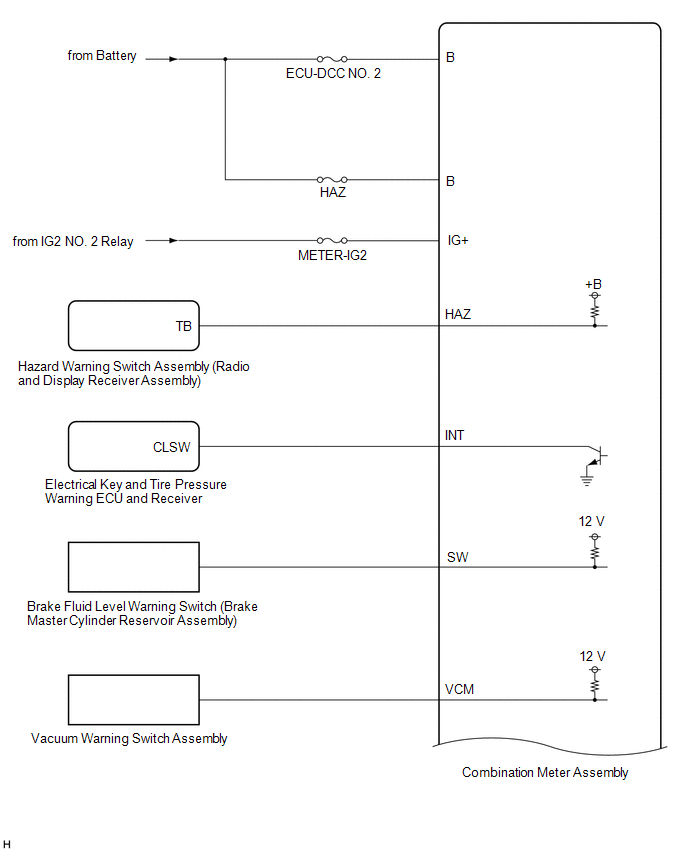
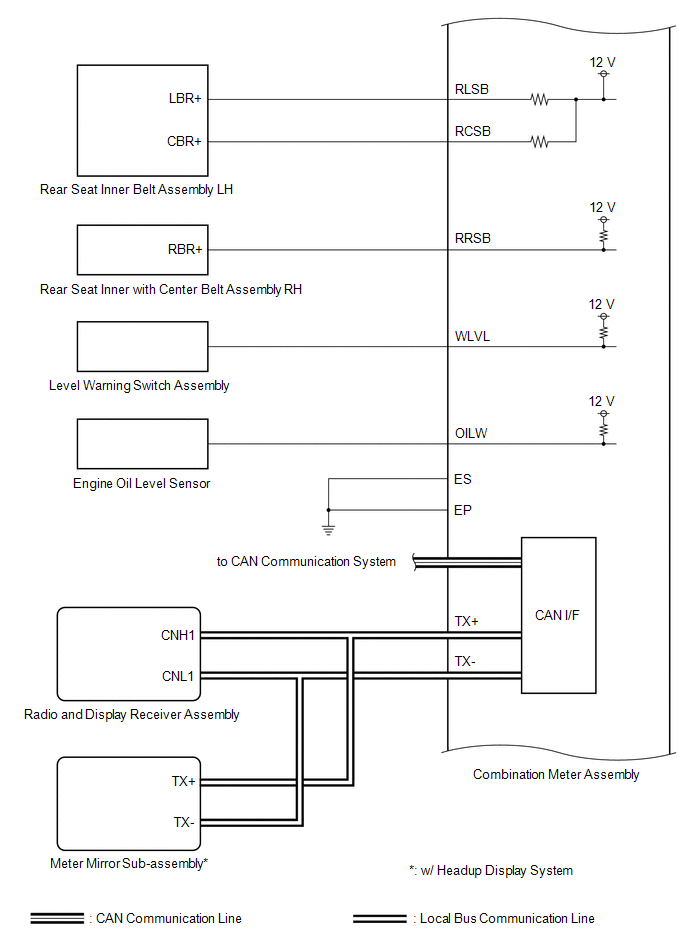
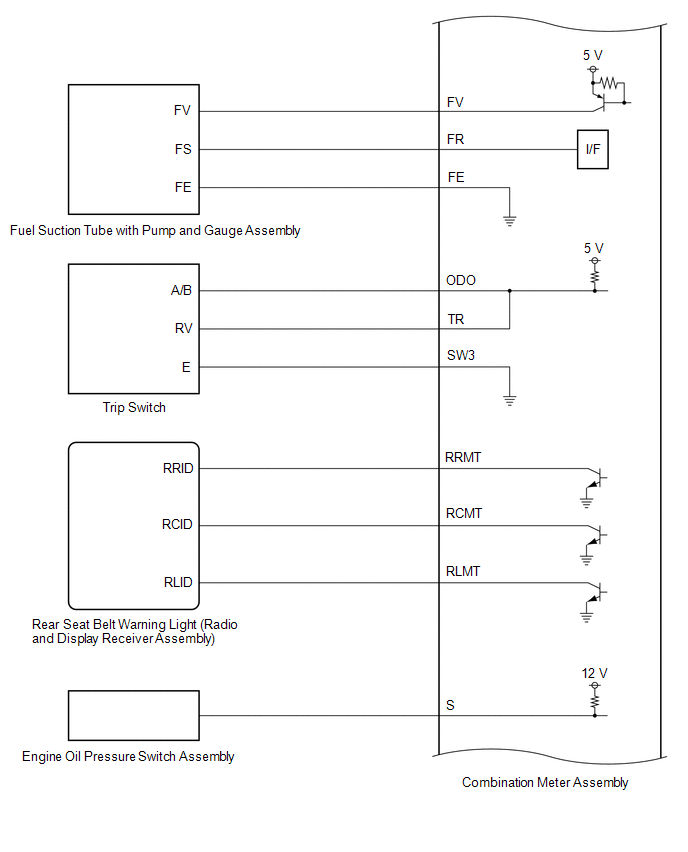
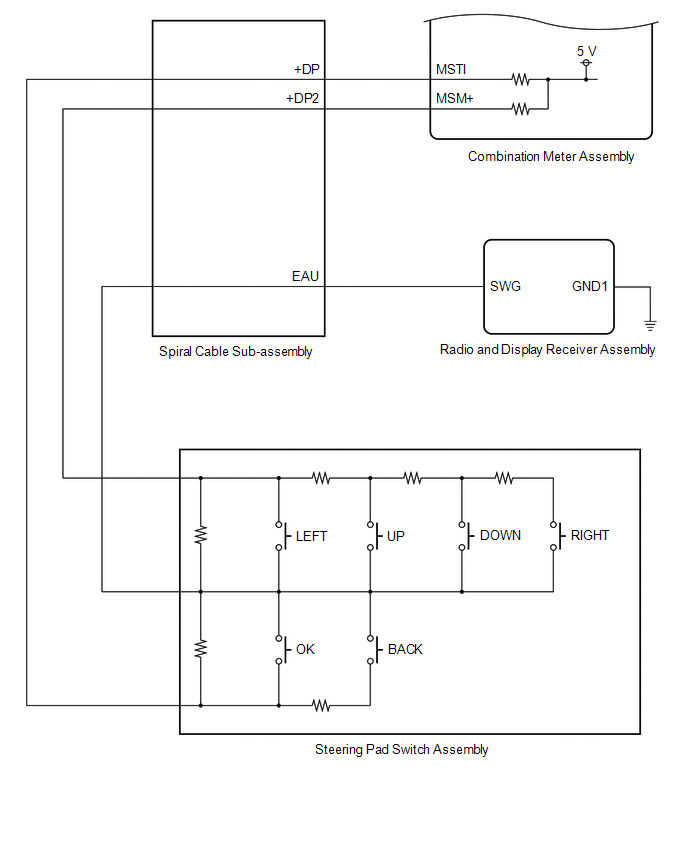
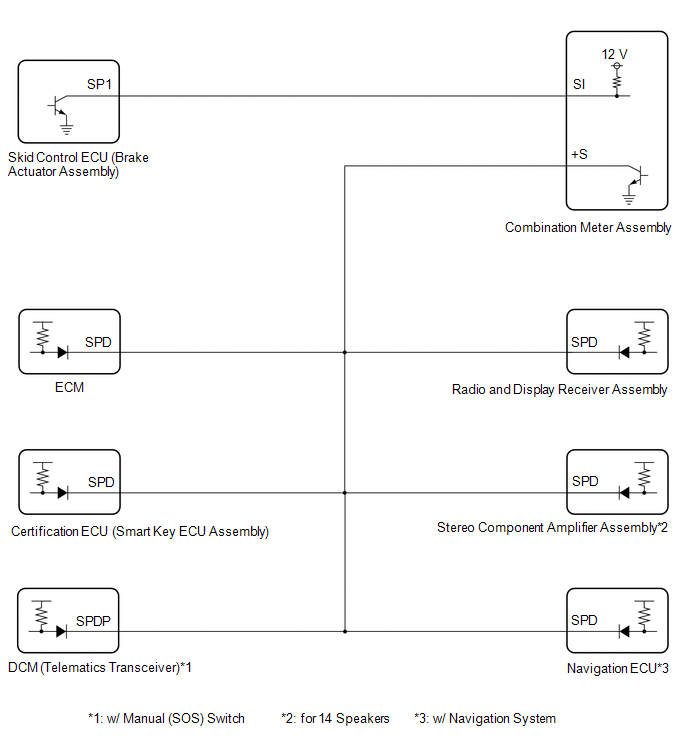
Tachometer Malfunction


B

A

B

A

Body Electrical > Combination Meter > Active Test
Body Electrical > Combination Meter > Active Test
Body Electrical > Combination Meter > Active Test
Body Electrical > Combination Meter > Active Test
Body Electrical > Combination Meter > Active Test
Body Electrical > Combination Meter > Active Test
Body Electrical > Combination Meter > Active Test
Body Electrical > Combination Meter > Active Test
OK

NG

Terminals Of Ecu

Toyota Avalon (XX50) 2019-2022 Service & Repair Manual > Window / Glass: Window Defogger System(for Gasoline Model)
Data List / Active Test DATA LIST / ACTIVE TEST ACTIVE TEST HINT: Using the Techstream to perform Active Tests allows relays, VSVs, actuators and other items to be operated without removing any parts. This non-intrusive functional inspection can be very useful because intermittent operation may be d ...