Components
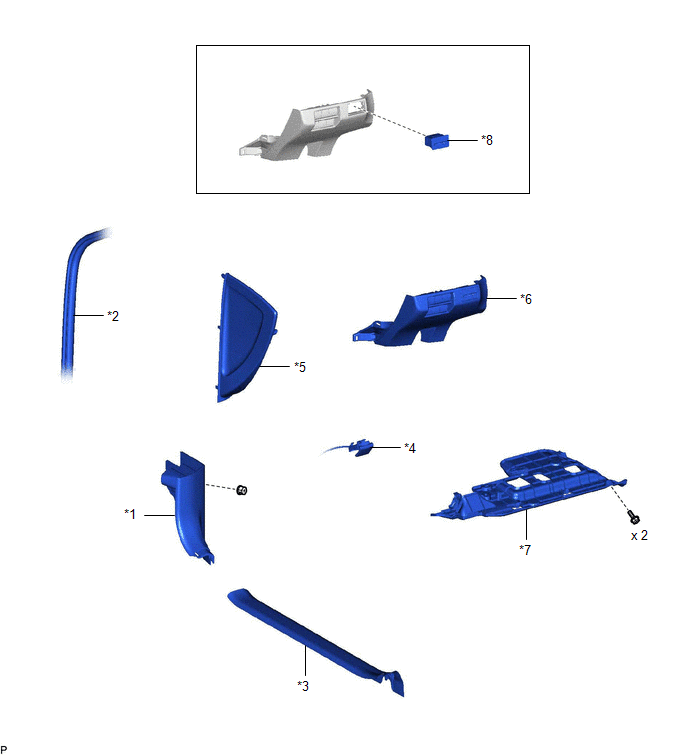
COMPONENTS
ILLUSTRATION
|
*1 | COWL SIDE TRIM SUB-ASSEMBLY LH |
*2 | FRONT DOOR OPENING TRIM WEATHERSTRIP LH |
|
*3 | FRONT DOOR SCUFF PLATE LH |
*4 | HOOD LOCK CONTROL LEVER SUB-ASSEMBLY |
|
*5 | INSTRUMENT SIDE PANEL LH |
*6 | NO. 1 INSTRUMENT PANEL SUB-ASSEMBLY |
|
*7 | NO. 1 INSTRUMENT PANEL UNDER COVER SUB-ASSEMBLY |
*8 | TRIP SWITCH |
Inspection
INSPECTION
PROCEDURE
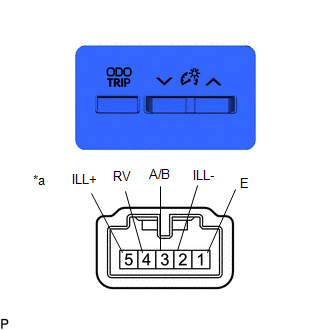
1. INSPECT TRIP SWITCH
| (a) Measure the resistance according to the value(s) in the table below.
Standard Resistance: |
Tester Connection | Condition |
Specified Condition | |
4 (RV) - 1 (E) | Light control rheostat up switch pressed |
Below 50 Ω | |
Light control rheostat up switch not pressed |
10 kΩ or higher | |
Light control rheostat down switch pressed |
1.71 to 1.94 kΩ | |
Light control rheostat down switch not pressed |
10 kΩ or higher | |
3 (A/B) - 1 (E) | ODO/TRIP switch pressed |
Below 50 Ω | |
ODO/TRIP switch not pressed |
10 kΩ or higher | If the result is not as specified, replace the trip switch. |
 |
|
*a | Component without harness connected
(Trip Switch) | | |
(b) Apply battery voltage to the trip switch and check that it illuminates.
OK:
|
Condition | Specified Condition |
|
Battery positive (+) → Terminal 5 (ILL+) Battery negative (-) → Terminal 2 (ILL-) |
Illuminates |
If the result is not as specified, replace the trip switch.
Installation
INSTALLATION
PROCEDURE
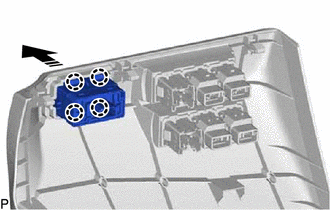
1. INSTALL TRIP SWITCH
(a) Engage the 4 claws as shown in the illustration to install the trip switch.
 |
Install in this Direction |
2. INSTALL NO. 1 INSTRUMENT PANEL SUB-ASSEMBLY
Click here 
3. CONNECT HOOD LOCK CONTROL LEVER SUB-ASSEMBLY
Click here
4. INSTALL NO. 1 INSTRUMENT PANEL UNDER COVER SUB-ASSEMBLY
Click here
5. INSTALL INSTRUMENT SIDE PANEL LH
Click here
6. INSTALL FRONT DOOR OPENING TRIM WEATHERSTRIP LH
Click here
7. INSTALL COWL SIDE TRIM SUB-ASSEMBLY LH
Click here
8. INSTALL FRONT DOOR SCUFF PLATE LH
Click here
Removal
REMOVAL
PROCEDURE
1. REMOVE FRONT DOOR SCUFF PLATE LH
Click here 
2. REMOVE COWL SIDE TRIM SUB-ASSEMBLY LH
Click here
3. DISCONNECT FRONT DOOR OPENING TRIM WEATHERSTRIP LH
Click here
4. REMOVE INSTRUMENT SIDE PANEL LH
Click here
5. REMOVE NO. 1 INSTRUMENT PANEL UNDER COVER SUB-ASSEMBLY
Click here
6. DISCONNECT HOOD LOCK CONTROL LEVER SUB-ASSEMBLY
Click here
7. REMOVE NO. 1 INSTRUMENT PANEL SUB-ASSEMBLY
Click here
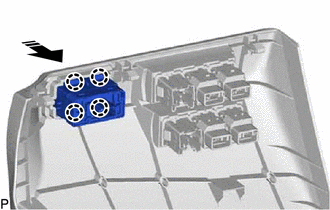
8. REMOVE TRIP SWITCH
(a) Disengage the 4 claws as shown in the illustration to remove the trip switch.
 |
Remove in this Direction |


