How To Proceed With Troubleshooting
CAUTION / NOTICE / HINT
HINT:
Use the following procedure to troubleshoot the wireless charging system.
PROCEDURE
| 1. |
VEHICLE BROUGHT TO WORKSHOP |
|
NEXT |
 | |
| 2. |
CUSTOMER PROBLEM ANALYSIS |
HINT:
- In troubleshooting, confirm that the problem symptoms have been
accurately identified. Preconceptions should be discarded in order to
make an accurate judgment. To clearly understand what the problem
symptoms are, it is extremely important to ask the customer about the
problem and the conditions at the time the malfunction occurred.
- Gather as much information as possible for reference. Past problems that seem unrelated may also help in some cases.
- The following 5 items are important points for problem analysis:
|
What |
Vehicle model, system name |
|
When |
Date, time, occurrence frequency |
|
Where |
Road conditions |
|
Under what conditions? |
Driving conditions, weather conditions |
|
How did it happen? |
Problem symptoms |
|
NEXT |
 | |
(a) Measure the battery voltage.
Standard Voltage:
11 to 14 V
If the voltage is below 11 V, recharge or replace the battery before proceeding to the next step.
(b) Check the fuses and relays.
(c)
Check the connector connections and terminals to make sure that there
are no abnormalities such as loose connections, deformation, etc.
|
NEXT |
 | |
| 4. |
PROBLEM SYMPTOMS TABLE |
(a) Refer to Problem Symptoms Table.
Click here 
|
Result | Proceed to |
|
Fault is not listed in Problem Symptoms Table |
A |
| Fault is listed in Problem Symptoms Table |
B |
| B |
 | GO TO STEP 6 |
|
A |
 | |
| 5. |
OVERALL ANALYSIS AND TROUBLESHOOTING |
(a) Operation Check.
Click here 
(b) Terminals of ECU.
Click here 
|
NEXT |
 | |
|
NEXT |
 | |
| NEXT |
 | END |
Operation Check
OPERATION CHECK
WIRELESS CHARGING SYSTEM OPERATION CHECK
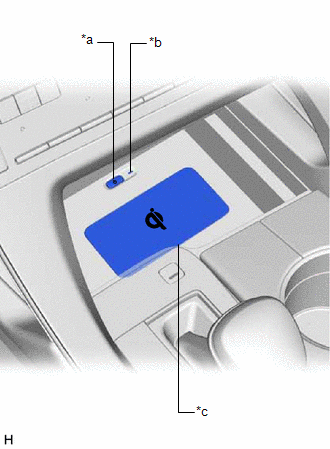
|
*a | Mobile Wireless Charger Switch |
|
*b | Indicator Light (Green/Amber) |
|
*c | Charging Area |
(a) Turn the engine switch on (IG or ACC).
HINT:
If
the engine switch is turned off when the wireless charging system is
on, the wireless charging system will automatically turn on the next
time the engine switch is turned on (IG or ACC).
(b) Turn the wireless charging system on and check that the indicator light (green) illuminates.
(c)
Place a rechargeable device on the charging area and check that the
indicator light (amber) illuminates, indicating charging is in progress.
HINT:
Refer to Precaution for details about Qi-compatible rechargeable devices.
Click here 
(d) Check that the indicator light (green) illuminates when charging is complete.
HINT:
Some
mobile devices, cases or accessories may not cause the indicator
(green) to illuminate when charging is complete, even though they are
Qi-compatible. Check the mobile device to confirm the charge status.
(e) Turn the wireless charging system off and check that the indicator light turns off.
Parts Location
PARTS LOCATION
ILLUSTRATION
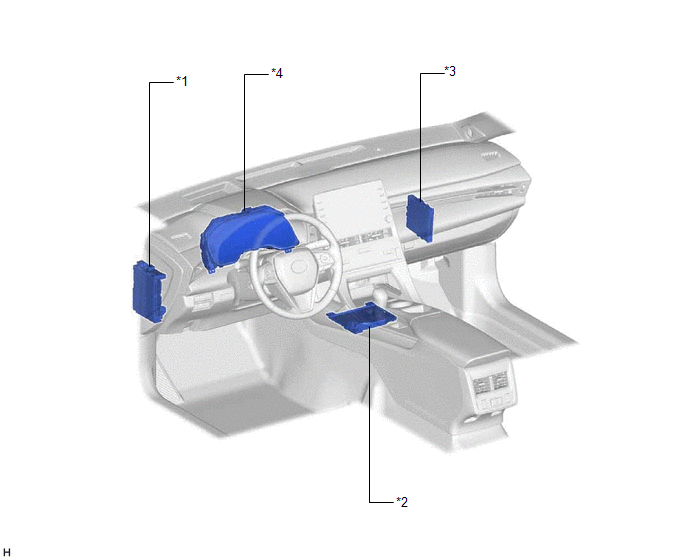
|
*1 | INSTRUMENT PANEL JUNCTION BLOCK ASSEMBLY
- ECU-ACC FUSE - PANEL FUSE - ECU-DCC NO. 2 FUSE |
*2 | MOBILE WIRELESS CHARGER CRADLE ASSEMBLY |
|
*3 | CERTIFICATION ECU (SMART KEY ECU ASSEMBLY) |
*4 | COMBINATION METER ASSEMBLY |
Precaution
PRECAUTION
PRECAUTION FOR DISCONNECTING CABLE FROM NEGATIVE BATTERY TERMINAL
NOTICE:
When
disconnecting the cable from the negative (-) battery terminal,
initialize the following systems after the cable is reconnected.
|
System Name | See Procedure |
|
Lane Departure Alert System (w/ Steering Control) |
 |
|
Intelligent Clearance Sonar System |
|
Parking Assist Monitor System |
|
Panoramic View Monitor System |
|
Pre-collision System |
|
Lighting System (w/ AFS) (EXT) |
PRECAUTION FOR WHEN USING WIRELESS CHARGER
(a)
When charging a rechargeable device while driving, for safety reasons,
the driver should not operate the rechargeable device.
(b)
People with implantable cardiac pacemakers, cardiac resynchronization
therapy pacemakers or implantable cardioverter defibrillators, or any
other electrical medical device, should consult their physician about
usage of the wireless charging system. Operation of the wireless
charging system may have an affect on medical devices.
(c)
Observe the following precautions. Failure to do so may result in a
fire, equipment failure or damage, or burns due to over heating.
- Do not put any metallic objects between the charging area and the rechargeable device while charging.
- Do not attach metallic objects, such as aluminum stickers, to the charging area.
- Do not cover the rechargeable device with a cloth or other object while charging.
- Do not attempt to charge rechargeable devices which are not compatible with the Qi wireless charging standard.
- Do not disassemble, modify or remove the mobile wireless charger cradle assembly.
- Do not apply force or impact to the mobile wireless charger cradle assembly.
(d) In the following situations, the wireless charging system may not operate correctly:
- When the rechargeable device is fully charged.
- When there is an foreign object between the charging area and rechargeable device.
- When a non-Qi-compatible cover or accessory is attached to the Qi-compatible rechargeable device.
- When the rechargeable device becomes hot while charging.
- When a rechargeable device is placed on the charging area with its charging surface facing up.
- When a rechargeable device is not centered on the charging area.
- When the vehicle is in an environment where it may be affected by strong radio waves or electrical noise.
- When the rechargeable device is in contact with, or is covered by any metallic object.
- When wireless keys (that emit radio waves) other than those of the vehicle are being used nearby.
(e) Do not bring magnetic cards,
such as credit cards, or magnetic recording media close to the mobile
wireless charger cradle assembly while charging. Otherwise, data may be
erased. Additionally, do not bring precision instruments, such as wrist
watches, close to the mobile wireless charger cradle assembly, as such
objects may malfunction.
(f) To prevent the battery
from discharging, do not use the wireless charging system for a long
period of time with the engine stopped.
Problem Symptoms Table
PROBLEM SYMPTOMS TABLE
HINT:
- Use the table below to help determine the cause of problem symptoms. If
multiple suspected areas are listed, the potential causes of the
symptoms are listed in order of probability in the "Suspected Area"
column of the table. Check each symptom by checking the suspected areas
in the order they are listed. Replace parts as necessary.
- Inspect the fuses and relays related to this system before inspecting the suspected areas below.
Wireless Charging System |
Symptom | Suspected Area |
Link |
|
Even when the wireless charging system is turned on, the indicator light (green) does not illuminate |
Wireless charger power source circuit |
 |
|
Mobile wireless charger cradle assembly |
 |
|
When
the wireless charging system is turned on, the indicator (green)
illuminates, but the indicator (amber) does not illuminate when a
rechargeable device is placed on the charging area (wireless charging
does not start) | Check that the device being used is a Qi-compatible rechargeable device |
- |
| Remove any cases and accessories |
- |
| Check that there is no gap between the rechargeable device and the charging area |
- |
| Check that there is no foreign matter between the rechargeable device and the charging area |
- |
| Check that the rechargeable device is not fully charged |
- |
| Check that the rechargeable device is centered on the charging area |
- |
| Check that the rechargeable device is placed on the charging area with its charging surface facing down |
- |
| Check that the vehicle is not in an environment where it may be affected by strong radio waves or electrical noise |
- |
| Check if more than 1 rechargeable device is placed on the charging area |
- |
| Check that a charging cable is not connected to the rechargeable device |
- |
| Check that temperature of the rechargeable device is not excessively high or low |
- |
| Check if wireless charging of the rechargeable device is possible using another Qi-compatible wireless charging system |
- |
| Check if wireless charging is possible using another Qi-compatible rechargeable device |
- |
| Status signal circuit |
 |
|
Mobile wireless charger cradle assembly |
 |
|
When
the wireless charging system is turned on, the indicator (green)
illuminates and when a rechargeable device is placed on the charging
area, the indicator (amber) illuminates, but the indicator (green)
illuminates again before wireless charging is completed (wireless
charging does not complete) | Check if the rechargeable device has not been moved out of the charging area |
- |
| Check that temperature of the rechargeable device is not excessively high or low |
- |
| Check that the vehicle is not in an environment where it may be affected by strong radio waves or electrical noise |
- |
| Status signal circuit |
 |
|
Mobile wireless charger cradle assembly |
 |
|
When the taillight on, the mobile wireless charger switch does not illuminate |
Wireless charger illumination circuit |
 |
|
Mobile wireless charger cradle assembly |
 |
|
The mobile wireless charger switch does not dim when the rheostat is operated |
Wireless charger illumination circuit |
 |
|
Mobile wireless charger cradle assembly |
 |
|
The indicator light (amber) blinks (pattern 1)* |
Status signal circuit |
 |
|
Mobile wireless charger cradle assembly |
 |
|
The indicator light (amber) blinks (pattern 2)* |
Check if the charging frequency is being changed |
 |
|
Mobile wireless charger cradle assembly |
 |
|
The indicator light (amber) blinks (pattern 3)* |
Check that the device being used is a Qi-compatible rechargeable device |
- |
| Remove any cases and accessories |
- |
| Check that there is no gap between the rechargeable device and the charging area |
- |
| Check that there is no foreign matter between the rechargeable device and the charging area |
- |
| Check that the rechargeable device is centered on the charging area |
- |
| Check that the rechargeable device is in the same position as when charging was started |
- |
| Mobile wireless charger cradle assembly |
 |
|
The indicator light (amber) blinks (pattern 4)* |
Check that temperature of the mobile wireless charger cradle assembly is not excessively high |
- |
| Mobile wireless charger cradle assembly |
 |
- *: For details about the indicator blinking patterns, refer to System Description.
Click here 
Status Signal Circuit
DESCRIPTION
This circuit
sends a charging suspension signal from the certification ECU (smart key
ECU assembly) to the mobile wireless charger cradle assembly. Based on
this signal, the mobile wireless charger cradle assembly suspends or
resumes wireless charging.
HINT:
The
wireless charging system uses the same radio wave frequency that is
used to perform verification of the electrical key transmitter
sub-assembly. Therefore, when the electrical key transmitter
sub-assembly verification is being performed, the certification ECU
(smart key ECU assembly) sends a charging suspension signal to the
wireless charging system to suspend charging.
WIRING DIAGRAM
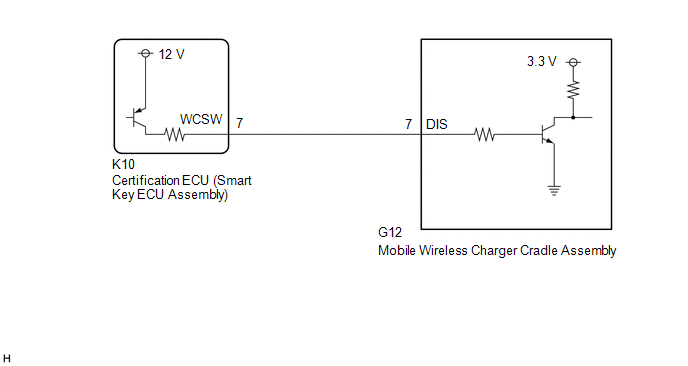
CAUTION / NOTICE / HINT
NOTICE:
Before replacing the certification ECU (smart key ECU assembly), refer to Registration.
Click here 
PROCEDURE
| 1. |
CHECK MOBILE WIRELESS CHARGER CRADLE ASSEMBLY (DIS TERMINAL) |
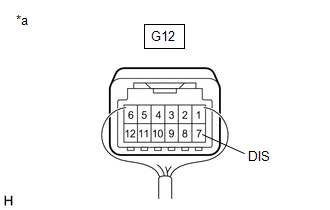
|
*a | Component with harness connected
(Mobile Wireless Charger Cradle Assembly) |
(a) Measure the voltage according to the value(s) in the table below.
Standard Voltage:
|
Tester Connection | Condition |
Specified Condition |
|
G12-7 (DIS) - Body ground |
For 5 seconds after turning engine switch from off to on (ACC)*1 |
4.5 to 6.0 V |
|
Device being charged |
Below 1 V |
|
Charging suspended due to smart key system status*2 |
4.5 to 6.0 V |
- *1: When the engine switch is turned from off to on (ACC), the mobile
wireless charger cradle assembly monitors the charging suspension signal
for 5 seconds. If the charging suspension signal is not 4 V or more for
0.8 seconds or more during monitoring, the mobile wireless charger
cradle assembly determines that there is an open in the charging
suspension signal line, blinks (pattern 1) the indicator light (amber),
and prohibits operation until the engine switch is turned from off to on
(ACC) again.
- *2: For details about conditions when the certification ECU (smart key
ECU assembly) sends the charging suspension signal, refer to System
Description.
Click here 
| OK |
 | PROCEED TO NEXT SUSPECTED AREA SHOWN IN PROBLEM SYMPTOMS TABLE |
|
NG |
 | |
| 2. |
CHECK HARNESS AND CONNECTOR (CERTIFICATION ECU (SMART KEY ECU ASSEMBLY) - MOBILE WIRELESS CHARGER CRADLE ASSEMBLY) |
(a) Disconnect the K10 certification ECU (smart key ECU assembly) connector.
(b) Disconnect the G12 mobile wireless charger cradle assembly connector.
(c) Measure the resistance according to the value(s) in the table below.
Standard Resistance:
|
Tester Connection | Condition |
Specified Condition |
|
K10-7 (WCSW) - G12-7 (DIS) |
Always | Below 1 Ω |
|
K10-7 (WCSW) or G12-7 (DIS) - Body ground |
Always | 10 kΩ or higher |
| OK |
 | REPLACE CERTIFICATION ECU (SMART KEY ECU ASSEMBLY) |
| NG |
 | REPAIR OR REPLACE HARNESS OR CONNECTOR |
System Description
SYSTEM DESCRIPTION
WIRELESS CHARGER FUNCTION OUTLINE
(a)
The wireless charging system enables Qi-compatible* rechargeable
devices, such as a cellular phone, to be recharged by merely placing it
on the charging area of the mobile wireless charger cradle assembly.
HINT:
*: Qi (pronounced chee) is a wireless technology which allows devices to recharge without using any wires.
(b)
Qi-compatible devices which do not fit within the charging area cannot
be used. If a Qi-compatible device does not operate normally, refer to
the owner's manual of the device.
(c) Qi-compatible rechargeable devices can be charged.
HINT:
- "Qi" and "Qi" logo are trademarks of the Wireless Power Consortium (WPC).
- Although the wireless charging system meets Qi standards, compatibility with all Qi-compatible devices is not guaranteed.
CHARGING INDICATOR STATUS
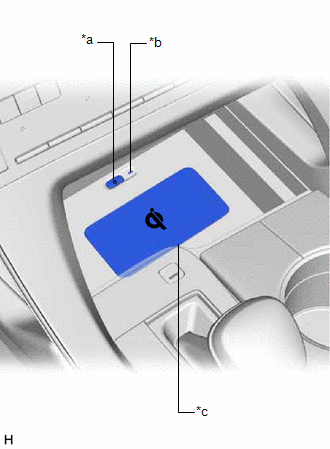
|
*a | Mobile Wireless Charger Switch |
|
*b | Indicator Light (Green/Amber) |
|
*c | Charging Area |
(a) The indicator light shows the operation condition of the wireless charging system.
|
Indicator | Operation Condition |
|
Condition | Color |
|
Off | - |
Wireless charging system is turned off |
|
On | Green |
- Wireless charging system is on (stand-by)
- Charging is complete*1
|
| On |
Amber |
- A rechargeable device is placed on the charging area
- A rechargeable device is being charged
|
| On (For 4.5 sec)*2 |
Green | Charging is stopped temporarily due to a charging suspension signal being received from the smart key system |
|
Blinks (Pattern 1)*3 |
Amber | An open in the charging suspension signal circuit is detected |
|
Blinks (Pattern 2)*3 |
Amber | The charging frequency is being changed |
|
Blinks (Pattern 3)*3 |
Amber |
- Foreign matter exists between the rechargeable device and the charging area
- A gap exists between the rechargeable device and the charging area
- The rechargeable device is not placed correctly on the charging area
- The rechargeable device has been moved from the position where it was first placed
|
| Blinks
(Pattern 4)*3 | Amber |
The temperature of the mobile wireless charger cradle assembly is abnormally high |
- *1: Some mobile devices, cases or accessories may not cause the
indicator (green) to illuminate when charging is complete, even though
they are Qi-compatible. Check the mobile device to confirm the charge
status.
- *2: If the charging suspension signal is received for less than 4.5
seconds, the indicator light (green) will remain illuminated for 4.5
seconds.
- *3: Refer to the following diagram for details about the indicator blinking patterns.
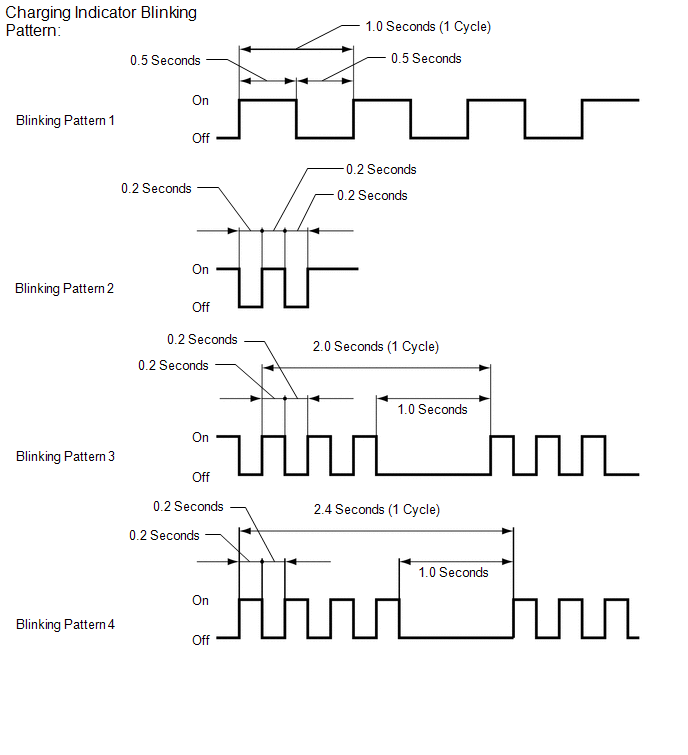
RESUMPTION OF CHARGING
(a)
After charging is complete, if the rechargeable device is left in the
same position on the charging area, charging will resume after 30
minutes elapse.
(b) Charging will resume if the
rechargeable device is moved or repositioned within the charging area,
or replaced with another rechargeable device within 30 minutes of
charging being completed.
(c) If the rechargeable
device is moved while it is being charged, charging will resume when the
device is placed on the charging area.
HINT:
If
charging is stopped and resumed repeatedly due to the rechargeable
device being moved or a communication error between the wireless
charging system and rechargeable device, charging will be prohibited
after a certain number of times to protect the rechargeable device.
SUSPENSION OF CHARGING DUE TO VERIFICATION OF ELECTRICAL KEY TRANSMITTER SUB-ASSEMBLY
(a)
The wireless charging system uses the same radio wave frequency that is
used to perform verification of the electrical key transmitter
sub-assembly. Therefore, when the electrical key transmitter
sub-assembly verification is being performed, the certification ECU
(smart key ECU assembly) sends a charging suspension signal to the
wireless charging system to suspend charging.
HINT:
- When charging is suspended due to the charging suspension signal, the indicator (green) will illuminate.
- If there is an open in the charging suspension signal circuit, the indicator (amber) will blink (pattern 1).
(b) The certification ECU (smart key
ECU assembly) sends the charging suspension signal when any of the
following conditions is met:
- A door is opened and closed.
- The back door opener switch is pressed.
- The back door is closed.
- The engine switch is turned on (START).
- An electrical key transmitter sub-assembly is not detected in the cabin.
CHARGING FREQUENCY SWITCHING FUNCTION
(a)
If noise is generated in the AM radio during charging, turn the
wireless charging system off and check if the noise is reduced. If the
noise is reduced, press and hold the mobile wireless charging switch for
approximately 2 seconds to change the charging frequency and reduce the
noise.
HINT:
When the charging frequency is being changed, the indicator (amber) blinks (pattern 2).
System Diagram
SYSTEM DIAGRAM
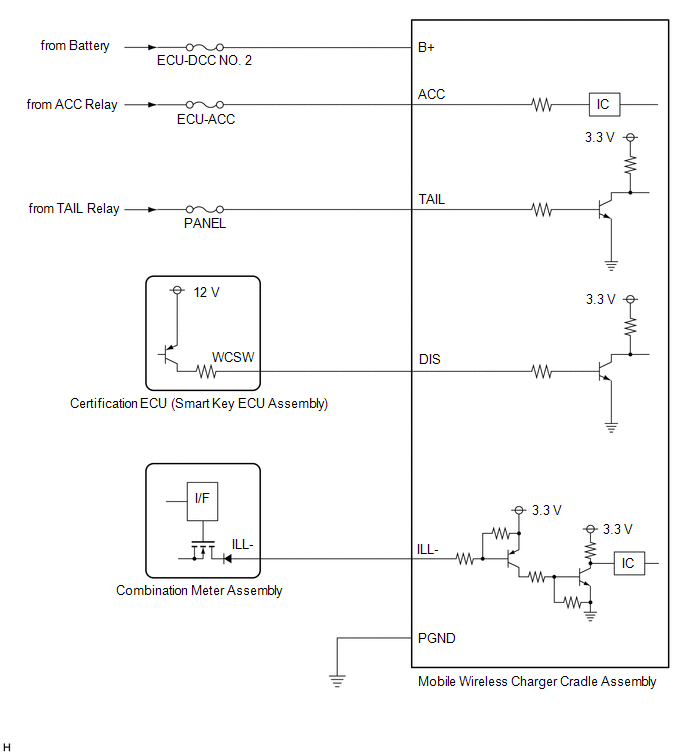
Terminals Of Ecu
TERMINALS OF ECU
CHECK MOBILE WIRELESS CHARGER CRADLE ASSEMBLY

|
Terminal No. (Symbol) | Wiring Color |
Terminal Description | Condition |
Specified Condition |
|
G12-1 (PGND) - Body ground |
W-B - Body ground | Ground |
Always | Below 1 V |
|
G12-5 (ACC) - G12-1 (PGND) |
BE - W-B |
Power source (ACC) | Engine switch on (ACC) |
11 to 14 V |
|
Engine switch off | Below 1 V |
|
G12-6 (B+) - G12-1 (PGND) |
R - W-B | Power source (+B) |
Always | 11 to 14 V |
|
G12-7 (DIS) - Body ground |
LG - Body ground |
Charging suspension signal |
For 5 seconds after turning engine switch from off to on (ACC)*1 |
4.5 to 6.0 V |
|
Device being charged |
Below 1 V |
|
Charging suspended due to smart key system status*2 |
4.5 to 6.0 V |
|
G12-9 (ILL-) - Body ground |
L - Body ground |
Illumination (rheostat) signal |
Taillight off | Below 1 V |
|
Taillight on | Pulse generation |
|
G12-10 (TAIL) - Body ground |
GR - Body ground |
Illumination signal | Taillight off |
Below 1 V |
|
Engine switch off, taillight on |
11 to 14 V |
- *1: When the engine switch is turned from off to on (ACC), the mobile
wireless charger cradle assembly monitors the charging suspension signal
for 5 seconds. If the charging suspension signal is not 4 V or more for
0.8 seconds or more during monitoring, the mobile wireless charger
cradle assembly determines that there is an open in the charging
suspension signal line, blinks (pattern 1) the indicator light (amber),
and prohibits operation until the engine switch is turned from off to on
(ACC) again.
- *2: For details about conditions when the certification ECU (smart key
ECU assembly) sends the charging suspension signal, refer to System
Description.
Click here 
Wireless Charger Illumination Circuit
DESCRIPTION
When the taillight on, this circuit sends an illumination signal to the mobile wireless charger cradle assembly.
WIRING DIAGRAM
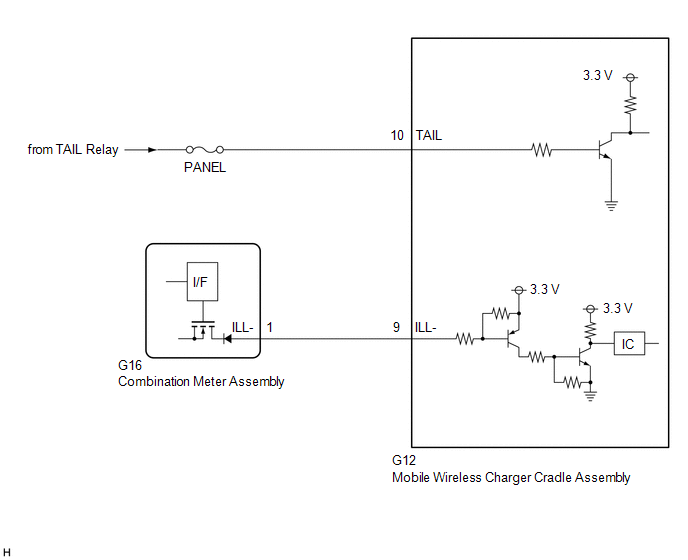
CAUTION / NOTICE / HINT
NOTICE:
Inspect the fuses for circuits related to this system before performing the following procedure.
PROCEDURE
| 1. |
CHECK HARNESS AND CONNECTOR (ILLUMINATION SIGNAL) |
(a) Disconnect the G12 mobile wireless charger cradle assembly connector.
(b) Measure the voltage according to the value(s) in the table below.
Standard Voltage:
|
Tester Connection | Condition |
Specified Condition |
|
G12-10 (TAIL) - Body ground |
Taillight off | Below 1 V |
|
Engine switch off, taillight on |
11 to 14 V |
| NG |
 | REPAIR OR REPLACE HARNESS OR CONNECTOR |
|
OK |
 | |
| 2. |
CHECK HARNESS AND CONNECTOR (COMBINATION METER ASSEMBLY - MOBILE WIRELESS CHARGER CRADLE ASSEMBLY) |
(a) Disconnect the G16 combination meter assembly connector.
(b) Measure the resistance according to the value(s) in the table below.
Standard Resistance:
|
Tester Connection | Condition |
Specified Condition |
|
G16-1 (ILL-) - G12-9 (ILL-) |
Always | Below 1 Ω |
|
G16-1 (ILL-) or G12-9 (ILL-) - Body ground |
Always | 10 kΩ or higher |
| OK |
 | PROCEED TO NEXT SUSPECTED AREA SHOWN IN PROBLEM SYMPTOMS TABLE |
| NG |
 | REPAIR OR REPLACE HARNESS OR CONNECTOR |
Wireless Charger Power Source Circuit
DESCRIPTION
This is the power source circuit for the mobile wireless charger cradle assembly.
WIRING DIAGRAM
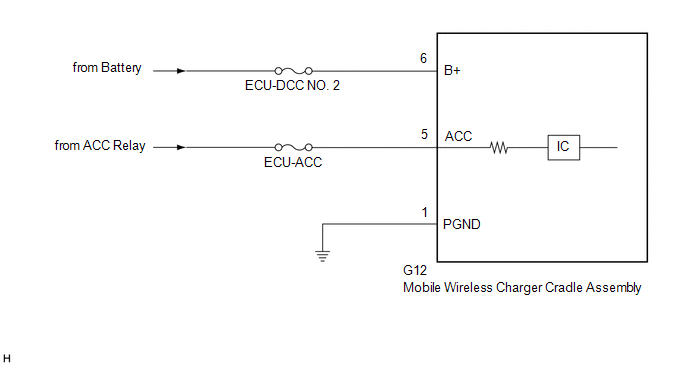
CAUTION / NOTICE / HINT
NOTICE:
Inspect the fuses for circuits related to this system before performing the following procedure.
PROCEDURE
| 1. |
CHECK HARNESS AND CONNECTOR (MOBILE WIRELESS CHARGER CRADLE ASSEMBLY POWER SOURCE) |
(a) Disconnect the G12 mobile wireless charger cradle assembly connector.
(b) Measure the resistance according to the value(s) in the table below.
Standard Resistance:
|
Tester Connection | Condition |
Specified Condition |
|
G12-1 (PGND) - Body ground |
Always | Below 1 Ω |
(c) Measure the voltage according to the value(s) in the table below.
Standard Voltage:
|
Tester Connection | Condition |
Specified Condition |
|
G12-6 (B+) - Body ground |
Always | 11 to 14 V |
|
G12-5 (ACC) - Body ground |
Engine switch on (ACC) |
11 to 14 V |
| OK |
 | PROCEED TO NEXT SUSPECTED AREA SHOWN IN PROBLEM SYMPTOMS TABLE |
| NG |
 | REPAIR OR REPLACE HARNESS OR CONNECTOR |


