Dtc Check / Clear
DTC CHECK / CLEAR
DTC CHECK
(a) Turn the engine switch off.
(b) Connect the Techstream to the DLC3.
(c) Turn the engine switch on (IG), and wait for at least 60 seconds.
(d) Turn the Techstream on.
(e) Enter the following menus: Body Electrical / SRS Airbag / Trouble Codes.
Body Electrical > SRS Airbag > Trouble Codes
(f) Check for DTCs by following the prompts on the Techstream screen.
HINT:
Refer to the Techstream operator's manual for further details.
DTC CLEAR
(a) Turn the engine switch off.
(b) Connect the Techstream to the DLC3.
(c) Turn the engine switch on (IG), and wait for at least 60 seconds.
(d) Turn the Techstream on.
(e) Enter the following menus: Body Electrical / SRS Airbag / Trouble Codes.
Body Electrical > SRS Airbag > Clear DTCs
(f) Clear the DTCs by following the prompts on the Techstream screen.
HINT:
Refer to the Techstream operator's manual for further details.
Operation Check
OPERATION CHECK
PRECAUTION FOR OPERATION CHECK
CAUTION:
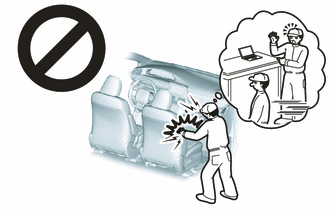
Use the correct procedure to replace the airbag parts.

CHECK SRS WARNING LIGHT
(a) Primary check
(1) Turn the engine switch on (IG) and check that the SRS warning light comes on.
(2)
Turn the engine switch off. Wait for at least 2 seconds, then turn the
engine switch on (IG). The SRS warning light comes on for approximately 6
seconds and diagnosis of the airbag system is performed.
NOTICE:
Turn the engine switch off when the battery is connected.
HINT:
- If the SRS warning light remains on for approximately 6 seconds or more
after the engine switch has been turned on (IG), there may be a
malfunction in the SRS airbag system.
- If the SRS warning light occasionally turns on approximately 6 seconds
or more after the engine switch has been turned on (IG), there may be a
short to +B, short to ground or an open in the SRS warning light
circuit.
- If the SRS warning light illuminates after turning the engine switch off
or to ACC, there may be a malfunction in the power source circuit or
combination meter assembly.
- The SRS warning light turns off, and then turns on. This blinking
pattern indicates a power source voltage drop. The SRS warning light
turns off 10 seconds after the power source voltage returns to normal.
FUNCTION OF PASSENGER AIRBAG ON/OFF INDICATOR
(a) Initial check
(1) Turn the engine switch on (IG).
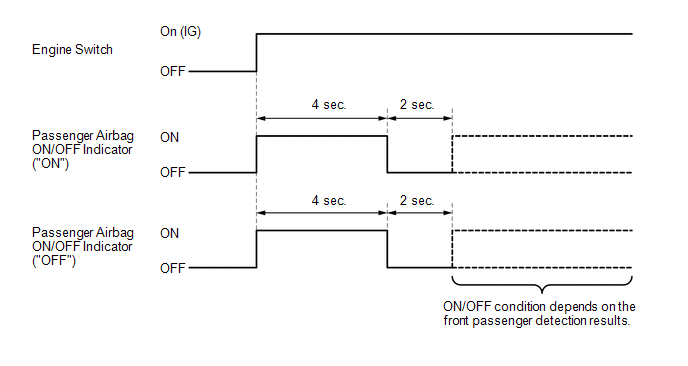
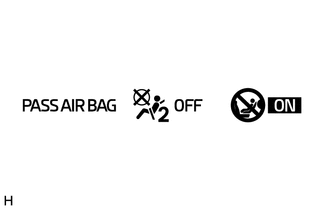
(2) The passenger airbag ON/OFF indicator comes on for approximately 4 seconds, then turns off for approximately 2 seconds.
(3)
Approximately 6 seconds after the engine switch is turned on (IG), the
passenger airbag ON/OFF indicator will indicate ON/OFF depending on the
following conditions.
Indicator Operation |
Front Passenger Seat Condition |
Passenger Airbag ON/OFF Indicator |
SRS Warning Light |
|
ON Indicator | OFF Indicator |
|
Vacant | OFF |
ON | OFF |
|
Adult*1 is seated | ON |
OFF | OFF |
|
Child*2 is seated | ON or OFF*2 |
OFF or ON*2 | OFF |
|
Child restraint system is installed |
OFF | ON |
OFF |
| Occupant classification system failure |
OFF | ON |
ON |
- *1: The system judges a person of average adult weight or more as an
adult. If a smaller adult sits in the front passenger seat, the system
may not recognize them as an adult depending on their physique and
posture.
- *2: The system may not recognize a child or a child in a child restrain
system as a child depending on factors such as the positioning of the
child restraint system or the child's physique or posture.
HINT:
- The passenger airbag ON/OFF indicator illuminates based on the following
timing chart in order to check the indicator light circuit.
- When the occupant classification system is malfunctioning, both the SRS
warning light and passenger airbag ON/OFF indicator ("OFF") come on. In
this case, perform troubleshooting for the airbag system DTCs first.

PASSENGER AIRBAG ON/OFF INDICATOR CHECK
(a) Turn the engine switch on (IG).

(b)
Check that the passenger airbag ON/OFF indicator ("ON" and "OFF") comes
on for approximately 4 seconds, then turns off for approximately 2
seconds.
HINT:
Refer to the
indicator operation table in Function of Passenger Airbag ON/OFF
Indicator for the passenger airbag ON/OFF indicator operation when the
engine switch is turned on (IG) and approximately 6 seconds elapse.
CHECK HORN BUTTON ASSEMBLY
Click here 
CHECK INSTRUMENT PANEL PASSENGER AIRBAG ASSEMBLY
Click here 
CHECK LOWER NO. 1 INSTRUMENT PANEL AIRBAG ASSEMBLY
Click here 
CHECK LOWER NO. 2 INSTRUMENT PANEL AIRBAG ASSEMBLY
Click here 
CHECK FRONT SEAT AIRBAG ASSEMBLY
Click here 
CHECK REAR SEAT AIRBAG ASSEMBLY
Click here 
CHECK CURTAIN SHIELD AIRBAG ASSEMBLY
Click here 
CHECK FRONT SEAT OUTER BELT ASSEMBLY
Click here 
CHECK REAR SEAT 3 POINT TYPE BELT ASSEMBLY
Click here 
CHECK AIRBAG ECU ASSEMBLY
Click here 
CHECK FRONT AIRBAG SENSOR
Click here 
CHECK SIDE AIRBAG PRESSURE SENSOR
Click here 
CHECK SIDE NO. 1 AIRBAG SENSOR
Click here 
CHECK SIDE NO. 2 AIRBAG SENSOR
Click here 
CHECK SEAT POSITION AIRBAG SENSOR
Click here 
CHECK OCCUPANT DETECTION ECU
Click here 
CHECK HARNESS AND CONNECTOR
(a) for Vehicle not Involved in Collision
(1) Perform a diagnostic system check.
(b) for Vehicle Involved in Collision and Airbag not Deployed
(1) Perform a diagnostic system check.
(c) for Vehicle Involved in Collision and Airbag is Deployed
(1) Perform a diagnostic system check.
(2) Check any of the wire harnesses in exposed contact with the airbag wire harness for damage.
(3) Check the connector of the airbag wire harness for scratches, cracks or damage.


