Components
COMPONENTS
ILLUSTRATION
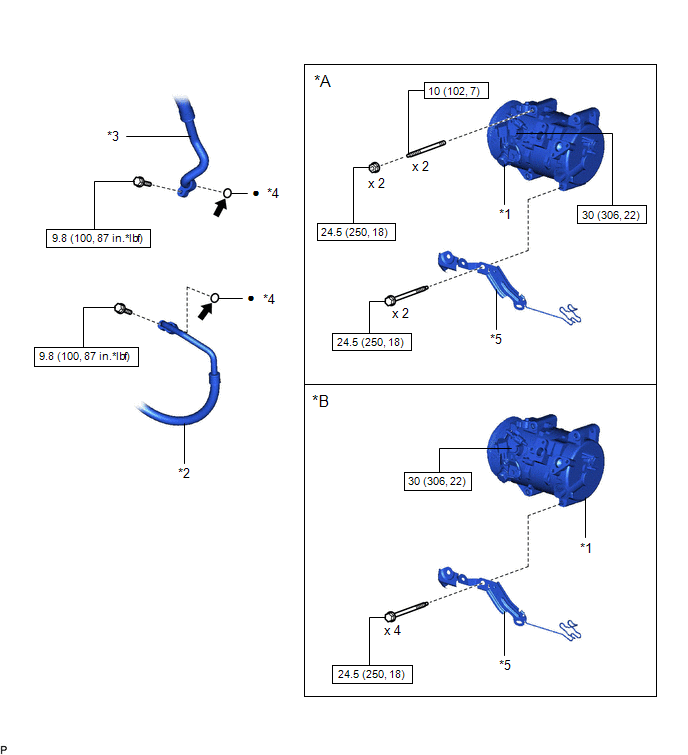
|
*A | for Type A |
*B | for Type B |
|
*1 | COMPRESSOR ASSEMBLY WITH MAGNETIC CLUTCH |
*2 | NO. 1 COOLER REFRIGERANT DISCHARGE HOSE SUB-ASSEMBLY |
|
*3 | SUCTION HOSE SUB-ASSEMBLY |
*4 | O-RING |
|
*5 | BRACKET |
- | - |
 |
N*m (kgf*cm, ft.*lbf): Specified torque |
â—Ź | Non-reusable part |
 |
Compressor oil ND-OIL 12 or equivalent |
- | - |
ILLUSTRATION
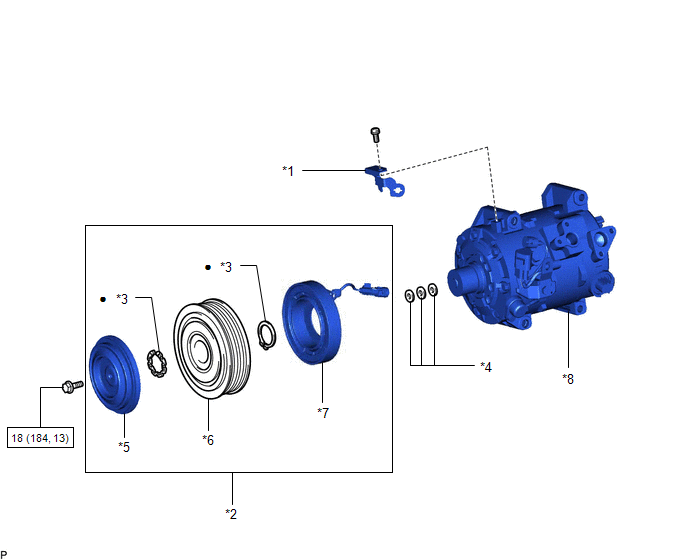
|
*1 | COOLER COMPRESSOR BRACKET |
*2 | MAGNET CLUTCH ASSEMBLY |
|
*3 | SNAP RING |
*4 | MAGNET CLUTCH WASHER |
|
*5 | MAGNET CLUTCH HUB |
*6 | MAGNET CLUTCH ROTOR |
|
*7 | MAGNET CLUTCH STATOR |
*8 | COOLER COMPRESSOR ASSEMBLY |
 |
N*m (kgf*cm, ft.*lbf): Specified torque |
â—Ź | Non-reusable part |
Disassembly
DISASSEMBLY
PROCEDURE
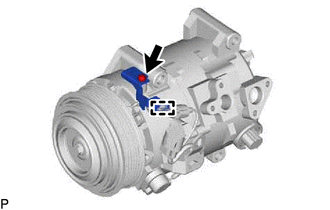
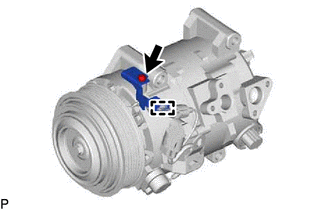
1. REMOVE COOLER COMPRESSOR BRACKET
(b) Remove the screw and cooler compressor bracket.
2. REMOVE MAGNET CLUTCH ASSEMBLY
| (a) Secure the compressor assembly with magnetic clutch in a vise between aluminum plates. |
|
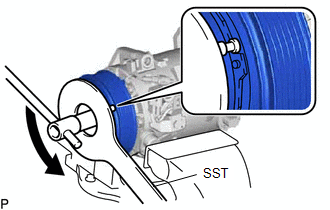
(b) Using SST, hold the magnet clutch hub.
SST: 09985-00270
(c) Remove the bolt, magnet clutch hub and magnet clutch washer(s).
HINT:
There is no set number of magnet clutch washers that are used for adjusting clutch clearance.
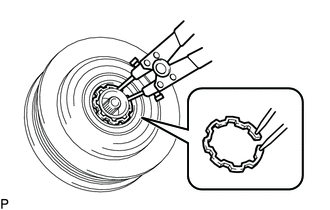
| (d) Using a snap ring expander, remove the snap ring and magnet clutch rotor.
NOTICE: Do not damage the seal cover of the bearing when removing the snap ring. |
|
(e) Disconnect the connector.
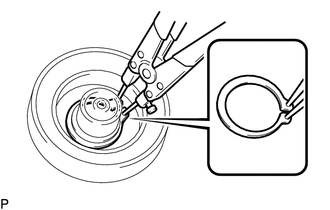
| (f) Using a snap ring expander, remove the snap ring and magnet clutch stator. |
|
Inspection
INSPECTION
PROCEDURE
1. INSPECT MAGNET CLUTCH ASSEMBLY
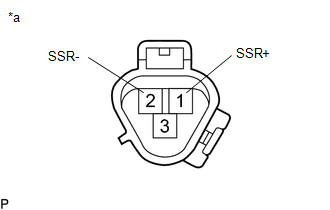
|
*a | Component without harness connected (Magnet Clutch Assembly) |
(a) Measure the resistance according to the value(s) in the table below.
Standard Resistance:
|
Tester Connection | Condition |
Specified Condition |
|
1 (SSR+) - 2 (SSR-) | 20°C (68°F) |
160 to 320 Ω |
Installation
INSTALLATION
PROCEDURE
1. ADJUST COMPRESSOR OIL
(a) When replacing the compressor assembly with magnetic clutch with a new one:
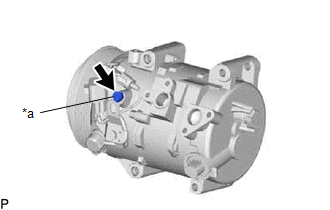
| (1) Remove the drain bolt (seal washer) from a new compressor assembly with magnetic clutch. |
 |
|
*a | Drain Bolt (Seal Washer) | | |
| (2)
Gradually discharge the inert gas from the service valve of the new
compressor assembly with magnetic clutch. Then drain the following
amount of oil from the new compressor before installation so that the
amount of oil contained in it is the same as that in the compressor to
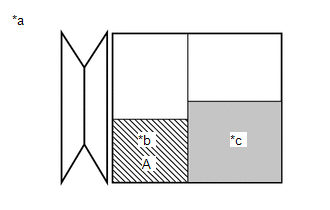
be replaced. HINT: New
compressors are filled with sufficient oil for the whole air
conditioning system. Therefore, it is necessary to drain oil from the
new compressor to compensate for oil remaining in the condenser and
cooling unit. Standard: (The
amount of compressor oil inside a new compressor assembly with magnetic
clutch: 70 (+15) cc (2.37 (+0.51) fl.oz)) - (The amount of compressor
oil remaining in the removed compressor assembly with magnetic clutch) =
The amount of compressor oil to be removed when replacing the
compressor assembly with magnetic clutch.
NOTICE:
|
 |
|
*a | Removed Compressor | |
*b | Amount of oil to be drained from removed compressor assembly with magnetic clutch | |
*c | Amount of oil remaining in the reserve chamber (60 cc (2.03 fl.oz)) | | |
(3) Install the drain bolt (seal washer).
Torque:
30 N·m {306 kgf·cm, 22 ft·lbf}
(b) If draining the oil is difficult, drain the oil using the following procedure:
(1) Remove the suction seal cap.
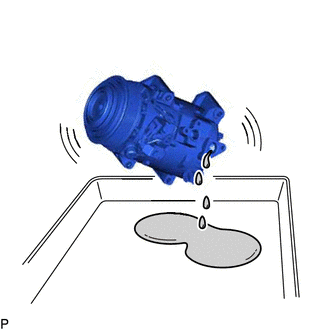
| (2) Lightly shake the compressor assembly with magnetic clutch with the suction port facing down, and drain the oil (*1).
NOTICE: Do not allow the pulley to come into contact with the compressor oil. |
|
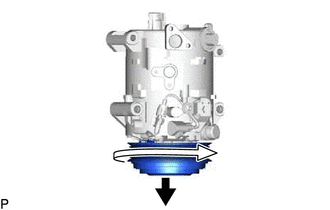
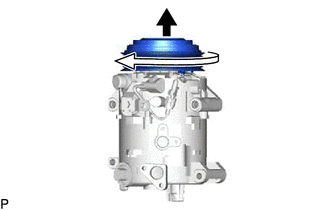
| (c)
With the pulley facing down, rotate the pulley as shown in the
illustration 10 times at a rate of approximately once every 2 seconds
(*2). CAUTION: If the pulley is rotated, refrigerant or oil may spray out. Thus, keep your face away from the compressor port. |
|
| (d) Rotate the pulley once as shown in the illustration while quickly turning the compressor up (*3). |
|
(e) Perform step (*1) and drain the oil (*4).
(f) Drain the oil by repeating steps (*2) to (*4) approximately 5 times.
2. INSTALL COMPRESSOR ASSEMBLY WITH MAGNETIC CLUTCH
(a) for Type A:
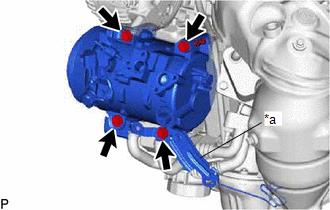
(1) Using an E8 "TORX" socket wrench, temporarily install the compressor assembly with magnetic clutch with the 2 stud bolts.
Torque:
10 N·m {102 kgf·cm, 7 ft·lbf}
(2) Install the compressor assembly with magnetic clutch and bracket with the 2 bolts and 2 nuts.
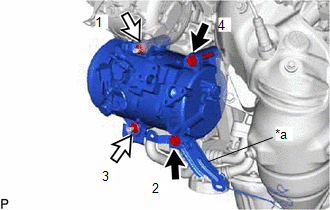
|
*a | Bracket |
 |
Bolt |
 |
Nut |
Torque:
24.5 N·m {250 kgf·cm, 18 ft·lbf}
HINT:
Tighten the bolts and nuts in the order shown in the illustration.
(b) for Type B:
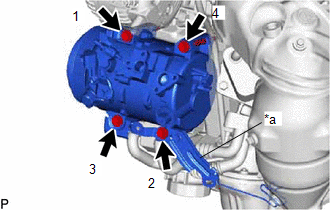
| (1) Install the compressor assembly with magnetic clutch and bracket with the 4 bolts.
Torque: 24.5 N·m {250 kgf·cm, 18 ft·lbf} HINT: Tighten the bolts in the order shown in the illustration. |
|
(c) Engage each clamp.
(d) Connect each connector.
3. CONNECT SUCTION HOSE SUB-ASSEMBLY
(a) Remove the vinyl tape from the suction hose sub-assembly.
(b) Sufficiently apply compressor oil to a new O-ring and the fitting surface of the suction hose sub-assembly.
Compressor Oil:
ND-OIL 12 or equivalent
(c) Install the O-ring to the suction hose sub-assembly.
(d) Connect the suction hose sub-assembly to the compressor assembly with magnetic clutch with the bolt.
Torque:
9.8 N·m {100 kgf·cm, 87 in·lbf}
4. CONNECT NO. 1 COOLER REFRIGERANT DISCHARGE HOSE SUB-ASSEMBLY
(a) Remove the vinyl tape from the No. 1 cooler refrigerant discharge hose sub-assembly.
(b)
Sufficiently apply compressor oil to a new O-ring and the fitting
surface of the No. 1 cooler refrigerant discharge hose sub-assembly.
Compressor Oil:
ND-OIL 12 or equivalent
(c) Install the O-ring to the No. 1 cooler refrigerant discharge hose sub-assembly.
(d)
Connect the No. 1 cooler refrigerant discharge hose sub-assembly to the
compressor assembly with magnetic clutch with the bolt.
Torque:
9.8 N·m {100 kgf·cm, 87 in·lbf}
5. INSTALL V-RIBBED BELT
Click here 
6. INSTALL RADIATOR ASSEMBLY
Click here

7. CHARGE AIR CONDITIONING SYSTEM WITH REFRIGERANT
Click here 
8. WARM UP ENGINE
Click here

9. INSPECT FOR REFRIGERANT LEAK
Click here

Reassembly
REASSEMBLY
PROCEDURE
1. INSTALL MAGNET CLUTCH ASSEMBLY
(a) Secure the cooler compressor assembly in a vise between aluminum plates.
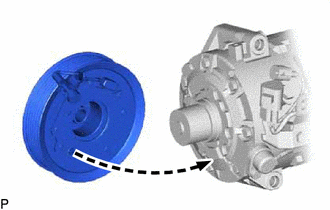
| (b) Install the magnet clutch stator with the parts aligned as shown in the illustration. |
|
| (c) Using a snap ring expander, install a new snap ring with the chamfered side facing outward.
NOTICE: When installing the snap ring, do not widen it excessively. |
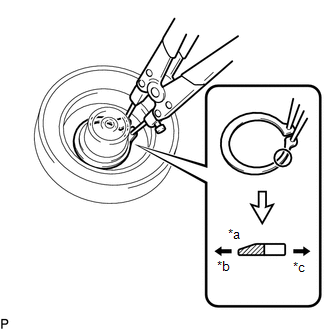 |
|
*a | Chamfered Side | |
*b | Inside | |
*c | Outside | | |
(d) Connect the connector.
| (e) Using a snap ring expander, install the magnet clutch rotor and a new snap ring with the chamfered side facing outward.
NOTICE:
- Do not damage the seal cover of the bearing when installing the snap ring.
- When installing the snap ring, do not widen it excessively.
|
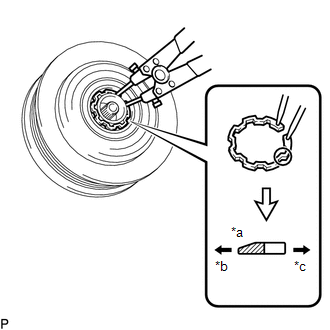 |
|
*a | Chamfered Side | |
*b | Inside | |
*c | Outside | | |
(f) Install the magnet clutch washer(s) and magnet clutch hub.
NOTICE:
Use the same magnet clutch washer(s) as removed during disassembly.
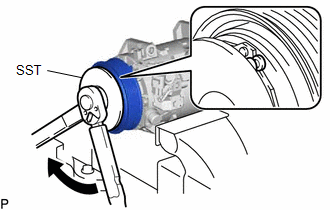
| (g) Using SST, hold the magnet clutch hub and install the bolt.
SST: 09985-00270 Torque: 18 N·m {184 kgf·cm, 13 ft·lbf}
NOTICE: Make sure that there is no foreign matter or oil on the compressor shaft, bolt and magnet clutch hub before installing the bolt. |
|
2. INSPECT MAGNET CLUTCH CLEARANCE
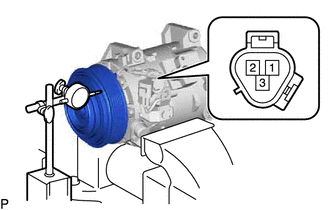
| (a) Set a dial indicator to the magnet clutch hub. | |
(b)
Connect a positive (+) lead from the battery to terminal 3 of the
magnet clutch connector and a negative (-) lead to the ground wire. Turn
the magnet clutch on and off and measure the clearance.
Standard Clearance:
0.35 to 0.60 mm (0.0138 to 0.0236 in.)
If
the measured value is not within the standard clearance, remove the
magnet clutch hub and adjust the clearance using magnet clutch washers
to obtain the standard clearance.
Magnet Clutch Washer Thickness:
0.1 mm (0.00394 in.)
0.3 mm (0.0118 in.)
0.5 mm (0.0197 in.)
NOTICE:
Adjustment should be performed with 3 or fewer magnet clutch washers.
(c) Remove the compressor assembly and magnetic clutch from the vise.
3. INSTALL COOLER COMPRESSOR BRACKET
| (a) Install the cooler compressor bracket with the screw. |
|
(b) Engage the clamp.
Removal
REMOVAL
CAUTION / NOTICE / HINT
The
necessary procedures (adjustment, calibration, initialization, or
registration) that must be performed after parts are removed and
installed, or replaced during compressor assembly with magnetic clutch
removal/installation are shown below.
Necessary Procedure After Parts Removed/Installed/Replaced |
Replaced Part or Performed Procedure |
Necessary Procedure | Effect/Inoperative Function when Necessary Procedure not Performed |
Link |
|
*: Applies only for when removing and installing or replacing the television camera assembly.
|
| Front television camera assembly, front bumper assembly or radiator grille |
- Television camera view adjustment
- Television camera assembly optical axis adjustment (Back camera position setting)*
| Panoramic View Monitor System |
 for Initialization for Initialization
 Calibration Calibration |
|
Front bumper assembly |
- Measurement of ultrasonic sensor detection angle
- Ultrasonic sensor detection angle registration
|
- Intelligent clearance sonar system
- Intuitive parking assist system
|
 |
- Headlight assembly LH
- Headlight ECU sub-assembly LH
| Synchronize the vehicle information |
Lighting system (for Gasoline Model with Cornering Light) |
 |
PROCEDURE
1. RECOVER REFRIGERANT FROM REFRIGERATION SYSTEM
Click here

2. REMOVE V-RIBBED BELT
Click here

3. REMOVE RADIATOR ASSEMBLY
Click here

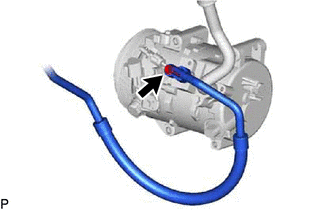
4. DISCONNECT NO. 1 COOLER REFRIGERANT DISCHARGE HOSE SUB-ASSEMBLY
| (a)
Remove the bolt and disconnect the No. 1 cooler refrigerant discharge
hose sub-assembly from the compressor assembly with magnetic clutch. |
|
(b) Remove the O-ring from the No. 1 cooler refrigerant discharge hose sub-assembly.
NOTICE:
Seal the openings of the disconnected parts using vinyl tape to prevent moisture and foreign matter from entering them.
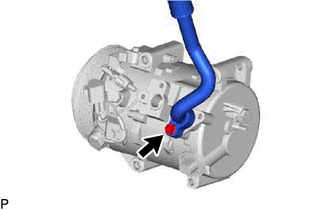
5. DISCONNECT SUCTION HOSE SUB-ASSEMBLY
| (a) Remove the bolt and disconnect the suction hose sub-assembly from the compressor assembly with magnetic clutch. |
|
(b) Remove the O-ring from the suction hose sub-assembly.
NOTICE:
Seal the openings of the disconnected parts using vinyl tape to prevent moisture and foreign matter from entering them.
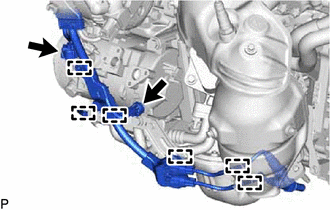
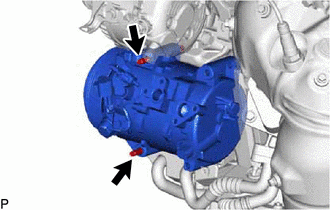
6. REMOVE COMPRESSOR ASSEMBLY WITH MAGNETIC CLUTCH
| (a) Disconnect each connector. | |
(b) Disengage each clamp.
(c) for Type A:
(1) Remove the 2 bolts and 2 nuts, and separate the bracket.
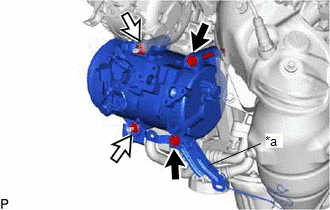
|
*a | Bracket |
 |
Bolt |
 |
Nut |
| (2) Using an E8 "TORX" socket wrench, remove the 2 stud bolts. |
|
(d) for Type B:
| (1) Remove the 4 bolts and separate the bracket. |
|
(e) Remove the compressor assembly with magnetic clutch.










 for Initialization
 Calibration


