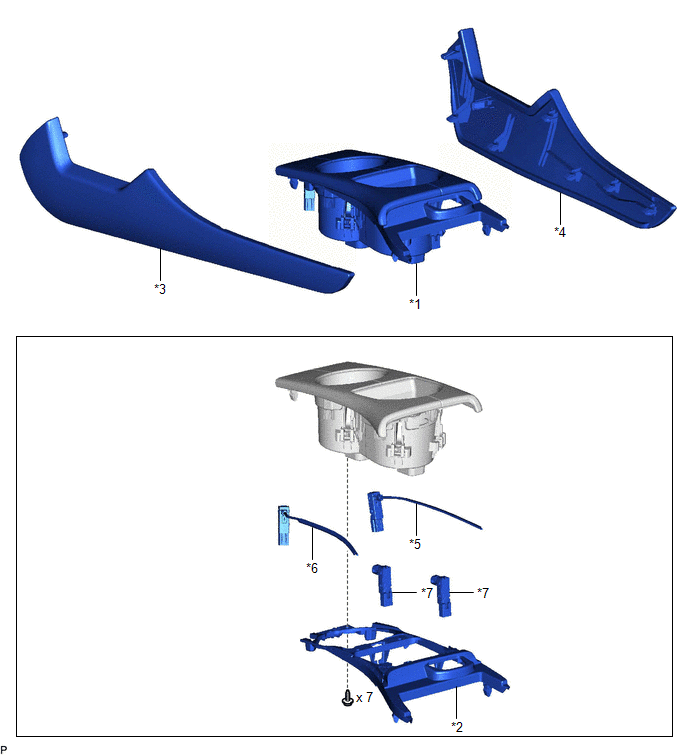
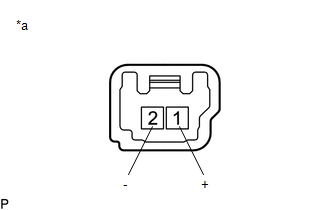
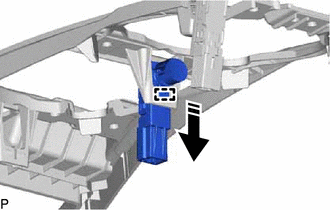
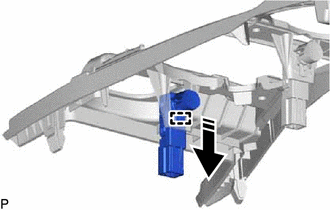
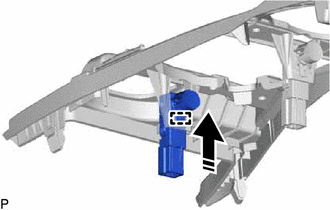
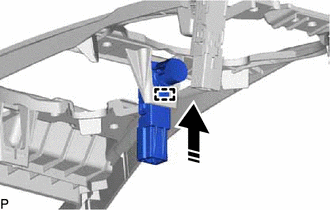
COMPONENTS ILLUSTRATION *1 FRONT CONSOLE UPPER PANEL GARNISH *2 INSTRUMENT PANEL CUP HOLDER ASSEMBLY *3 LOWER INSTRUMENT PANEL FINISH PANEL LH *4 LOWER INSTRUMENT PANEL FINISH PANEL RH *5 NO. 2 INTERIOR ILLUMINATION LIGHT SUB-ASSEMBLY *6 NO. 3 INTERIOR ILLUMINATION LIGHT SUB-ASSEMBLY *7 NO. 4 INTERIOR ILLUMINATION LIGHT SUB-ASSEMBLY - - INSPECTION PROCEDURE 1. INSPECT NO. 2 INTERIOR ILLUMINATION LIGHT SUB-ASSEMBLY (a) Apply auxiliary battery voltage to the No. 2 interior illumination light sub-assembly and check that the light illuminates. OK: Measurement Condition Specified Condition Auxiliary battery positive (+) → 1 (+) Auxiliary battery negative (-) → 2 (-) Ambient light illuminates If the result is not as specified, replace the No. 2 interior illumination light sub-assembly. *a Component without harness connected (No. 2 Interior Illumination Light Sub-assembly) 2. INSPECT NO. 3 INTERIOR ILLUMINATION LIGHT SUB-ASSEMBLY (a) Apply auxiliary battery voltage to the No. 3 interior illumination light sub-assembly and check that the light illuminates. OK: Measurement Condition Specified Condition Auxiliary battery positive (+) → 1 (+) Auxiliary battery negative (-) → 2 (-) Ambient light illuminates If the result is not as specified, replace the No. 3 interior illumination light sub-assembly. *a Component without harness connected (No. 3 Interior Illumination Light Sub-assembly) 3. INSPECT NO. 4 INTERIOR ILLUMINATION LIGHT SUB-ASSEMBLY (a) Apply auxiliary battery voltage to the No. 4 interior illumination light sub-assembly and check that the light illuminates. OK: Measurement Condition Specified Condition Auxiliary battery positive (+) → 1 (+) Auxiliary battery negative (-) → 2 (-) Ambient light illuminates If the result is not as specified, replace the No. 4 interior illumination light sub-assembly. *a Component without harness connected (No. 4 Interior Illumination Light Sub-assembly) INSTALLATION PROCEDURE 1. INSTALL NO. 3 INTERIOR ILLUMINATION LIGHT SUB-ASSEMBLY (a) Engage the 2 guides to install the No. 3 interior illumination light sub-assembly. 2. INSTALL NO. 2 INTERIOR ILLUMINATION LIGHT SUB-ASSEMBLY (a) Engage the 2 guides to install the No. 2 interior illumination light sub-assembly. 3. INSTALL NO. 4 INTERIOR ILLUMINATION LIGHT SUB-ASSEMBLY (a) for Front Side: (1) Engage the guide as shown in the illustration to install the No. 4 interior illumination light sub-assembly. Install in this Direction (b) for Rear Side: (1) Engage the guide as shown in the illustration to install the No. 4 interior illumination light sub-assembly. Install in this Direction 4. INSTALL INSTRUMENT PANEL CUP HOLDER ASSEMBLY (a) Install the instrument panel cup holder assembly with the 7 screws. 5. INSTALL FRONT CONSOLE UPPER PANEL GARNISH Click here
6. INSTALL LOWER INSTRUMENT PANEL FINISH PANEL RH Click here 7. INSTALL LOWER INSTRUMENT PANEL FINISH PANEL LH Click here REMOVAL PROCEDURE 1. REMOVE LOWER INSTRUMENT PANEL FINISH PANEL LH Click here 2. REMOVE LOWER INSTRUMENT PANEL FINISH PANEL RH Click here 3. REMOVE FRONT CONSOLE UPPER PANEL GARNISH Click here 4. REMOVE INSTRUMENT PANEL CUP HOLDER ASSEMBLY (a) Remove the 7 screws and instrument panel cup holder assembly. 5. REMOVE NO. 4 INTERIOR ILLUMINATION LIGHT SUB-ASSEMBLY (a) for Rear Side: (1) Disengage the guide as shown in the illustration to remove the No. 4 interior illumination light sub-assembly. Remove in this Direction (b) for Front Side: (1) Disengage the guide as shown in the illustration to remove the No. 4 interior illumination light sub-assembly. Remove in this Direction 6. REMOVE NO. 2 INTERIOR ILLUMINATION LIGHT SUB-ASSEMBLY (a) Disengage the 2 guides to remove the No. 2 interior illumination light sub-assembly. 7. REMOVE NO. 3 INTERIOR ILLUMINATION LIGHT SUB-ASSEMBLY (a) Disengage the 2 guides to remove the No. 3 interior illumination light sub-assembly.Components
Inspection
Installation


Removal


Toyota Avalon (XX50) 2019-2022 Service & Repair Manual > Door / Hatch: Rear Door Opening Trim Weatherstrip
Components COMPONENTS ILLUSTRATION *A for Gasoline Model *B w/ Seat Heater System *1 SPARE WHEEL COVER ASSEMBLY - - ILLUSTRATION *A for Gasoline Model *B w/ Seat Heater System *1 LUGGAGE COMPARTMENT INNER TRIM PAD *2 REAR CENTER SEAT OUTER BELT ASSEMBLY *3 REAR SEAT CUSHION ASSEMBLY *4 REAR SEAT CUS ...


